Managing Your Branches

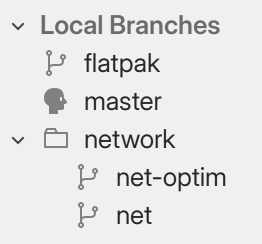
Local branches in the Sidebar.
“master” is checked out.
All of the local branches in your repository are listed under
Local Branches in the sidebar
(or just Branches if the sidebar is narrow).
A little head is shown next to your current HEAD branch,
i.e. the currently checked-out branch.
Tip
Press Ctrl H to jump to the HEAD.
Creating a new branch
You can start a new branch from several places:
From the Commit History: Right-click on any commit, then select New Branch Here.
From the Sidebar: Right-click on any local or remote branch, then select New Branch Here.
From the Tool Bar: Click the
Branch button to start a branch off the HEAD commit.
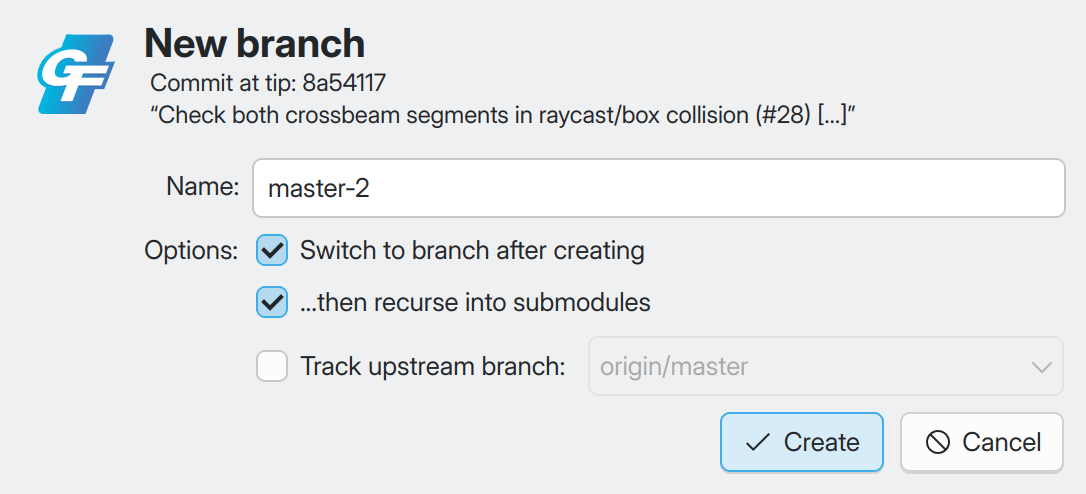
After you’ve triggered one of the actions above, the “New Branch” dialog will let you set up the branch:

The New Branch dialog.
Item |
Description |
|---|---|
Name |
You can name your branch however you want, bar some restrictions. GitFourchette will let you know if the name you’ve entered isn’t compliant. |
Switch to branch after creating |
Tick this to switch to the new branch after creating it. Otherwise, the repository will remain on the current branch. |
…then recurse into submodules |
Tick this to update the submodules after switching to the new branch. (Only available if your repository uses submodules.) |
Track upstream branch |
If a remote branch points to the target commit for the new branch, you can make it the upstream for the new branch. (You can always change the upstream later.) |
Tip
Press Ctrl B to create a new branch on the current HEAD commit.
Switching to another branch
You can switch to another branch from the Sidebar, or from the Commit History.
From the Sidebar,
double-click any local branch. You will be asked to confirm the switch. If your repository has any submodules, you will also be asked whether to update them.
From the Commit History,
double-click a commit that is the tip of a local branch (these commits are adorned with a purple box – e.g.
 ).
This brings up the “Check out Commit” dialog, which lets you confirm the switch.
After switching to another branch, notice that the HEAD branch
has changed in the Sidebar, as well as in the Commit History (e.g.
 ).
).
Note
You can’t switch to a remote branch. To achieve something similar, you can create a local branch that tracks the remote branch, then switch to it: right-click on the remote branch in the Sidebar then select New Local Branch Here.
Merging another branch into yours
You can merge any local or remote branch into your current branch:
From the Sidebar: Right-click on the branch you’d like to merge from, then select Merge into (current branch).
From the Commit History: Right-click on the tip of the branch you’d like to merge from, then select Merge into (current branch).
GitFourchette will attempt to fast-forward your current branch to the branch you’re merging from. This avoids creating a merge commit.
If fast-forwarding isn’t possible, GitFourchette will ask you to resolve the merge conflicts. hen, conclude the merge by creating a merge commit. Read Resolving Merge Conflicts for more details.
Organizing your branches in folders
Your local branches can be organized in folders.
Just like paths in a file system, GitFourchette treats the slash character
/ in a branch name as a “folder separator”.
For example, if your repository contains branches foo/branch1,
foo/branch2 and foo/branch3, then GitFourchette will group
all three of these under the folder foo.
Note
Folders are automatically inferred from the names of your branches; you can’t “create” folders per se. To conjure up a new folder, rename one of your branches, and insert a slash / in its name: e.g. rename mybranch to newfolder/mybranch.
Folders can be nested. The sidebar will combine chains of nested folders when possible.
Right-click on a folder to open a context menu
that will let you act on all branches within it. You can:
Action |
Description |
|---|---|
Rename Folder |
Rename the part preceding “/” for all branches in the folder. |
Delete Folder |
Delete all local branches in the folder. |
Hide Folder |
Hide all branches in the folder from the commit history. |
Hiding branches in the Commit History
You can hide any branch from the Commit History.
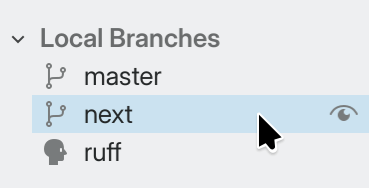
Move your mouse pointer over one of the branches in the Sidebar and an eye icon
() will appear. Click it, and the branch will be hidden
from the graph, as indicated by a crossed-out eye icon (
).
To unhide the branch, click the eye icon again.

Hovering over a branch in the Sidebar.
Note
Even if you hide a branch, it may still be shown in the Commit History if another visible branch points to the same commit.
New in v1.3.0: You can also show a single branch and hide
all others. Move your mouse cursor over the eye icon in the sidebar, then
middle-click it. An inverted eye icon () will
appear, indicating that the graph only displays this one branch.

Hiding all but one branch.