Welcome to GitFourchette!
Welcome to GitFourchette, the comfortable Git UI for Linux!
Explore your repositories easily. Craft commits intuitively. With its comfortable Qt interface, GitFourchette will become your sidekick to navigate and get work done in your Git repositories.
This document is part user’s guide, part reference. It will get you up to speed on common use cases so you can feel at home in GitFourchette. Interspersed throughout the guide are command tables detailing more advanced features.
This guide assumes you’re familiar with the basic tenets of Git, especially commits, branches, and remotes. If you need a refresher on those, I recommend skimming chapters 2 and 3 of the “Pro Git” book—or, for a more relaxed read, “How Git Works”. These books will teach you some Git commands, but the very same concepts apply in GitFourchette.
About the project
I started out writing GitFourchette in my spare time to scratch my itch for a Git UI I’d feel cozy in. After plenty of “dogfooding it” to develop my other projects, I’m finally taking the plunge and releasing it publicly—maybe it’ll become your favorite Git client too.
GitFourchette is free—both as in beer and as in freedom. But if it helped you get work done, feel free to buy me a coffee! Any contribution will encourage the continuation of the project. Thank you!
Cloning or Creating a Repository
First things first—we need a repository to work on! Of course, GitFourchette can open any repository you already have on your disk: go to or press Ctrl O.
But beyond opening an existing repo, you can also clone a repository from a remote, or initialize a new repository on your machine.
If you’re dipping your toes in Git, I recommend cloning a repository so that you see what GitFourchette is like in a “real” repo that already has some history. Here’s a URL you can try to clone: https://github.com/libgit2/pygit2
Cloning a repository from a remote host
In Git parlance, cloning means to download a repository, typically from a remote host.
Go to or press Ctrl Shift N. The “Clone” dialog appears:

The Clone dialog.
Let’s review the fields and options in this dialog:
Choice |
Description |
|---|---|
URL |
GitFourchette automatically fills in the URL from your clipboard if possible. You can use the ssh/https button to convert the URL to another protocol. |
Clone into |
Where to save the repository on your machine. This must be an empty directory; it will be created if it doesn’t exist. GitFourchette automatically suggests a path when you enter an URL, but you can click Browse to set your own empty directory. You can also type in a path manually; the “~” character will expand to your home directory. |
Recurse into submodules |
Tick this to clone the submodules recursively, if the repository has any. If you’re unsure, just keep this ticked—it doesn’t hurt even if there are no submodules. |
Shallow clone |
Tick this if you don’t need the repository’s full commit history. This may speed up the download and save some disk space, but you won’t be able to look up old commits. Shallow cloning only fetches the most recent commits on each branch (you can specify how many). |
Log in to SSH remotes with custom key file |
By default, OpenSSH automatically looks for a matching key in your ~/.ssh directory if an SSH remote requires authentication. Tick this to bypass automatic key detection and specify a key file to connect to remotes in this repo. After cloning, you can change or remove the custom key file in . |
Status |
This box will display download progress information. |
When you’re satisfied with your settings, click the Clone button and wait for the download to complete.
Note
Log in to SSH remotes with custom key file is particularly useful if you have multiple repos requiring different credentials—for example, if you juggle between two accounts for personal and work projects.
After cloning the repo, you can change or remove the custom key file via .
Note
By default, Clone into automatically suggests your Downloads folder, but you can change the default location to something else. After filling in a path for Clone into, long-click the Browse button and choose Set as default clone location.
Creating a blank repository from scratch
Go to or press Ctrl N. A folder picker appears.
In the folder picker, create an empty folder for your repo. It’s important that the folder be empty to start a blank repository from scratch! (GitFourchette will ask you to confirm if you give it a non-empty folder.)
Click Create repo here when you’re ready. Welcome to your new repository! Some operations, such as creating branches, require that you create an initial commit (see Making a Commit).
Initializing a repository from existing sources on your machine
Go to or press Ctrl N. A folder picker appears.
Navigate to the root folder of your source code, then click Create repo here. GitFourchette will ask you to confirm to initialize a repository in a non-empty folder.
The entire contents of your source tree will now appear as unstaged files in the Working Directory. At this point, you should stage all relevant files and create the initial commit (see Making a Commit).
A Tour of the Main Window
Once you’ve created or opened a repository in GitFourchette, the main window presents you with these elements:
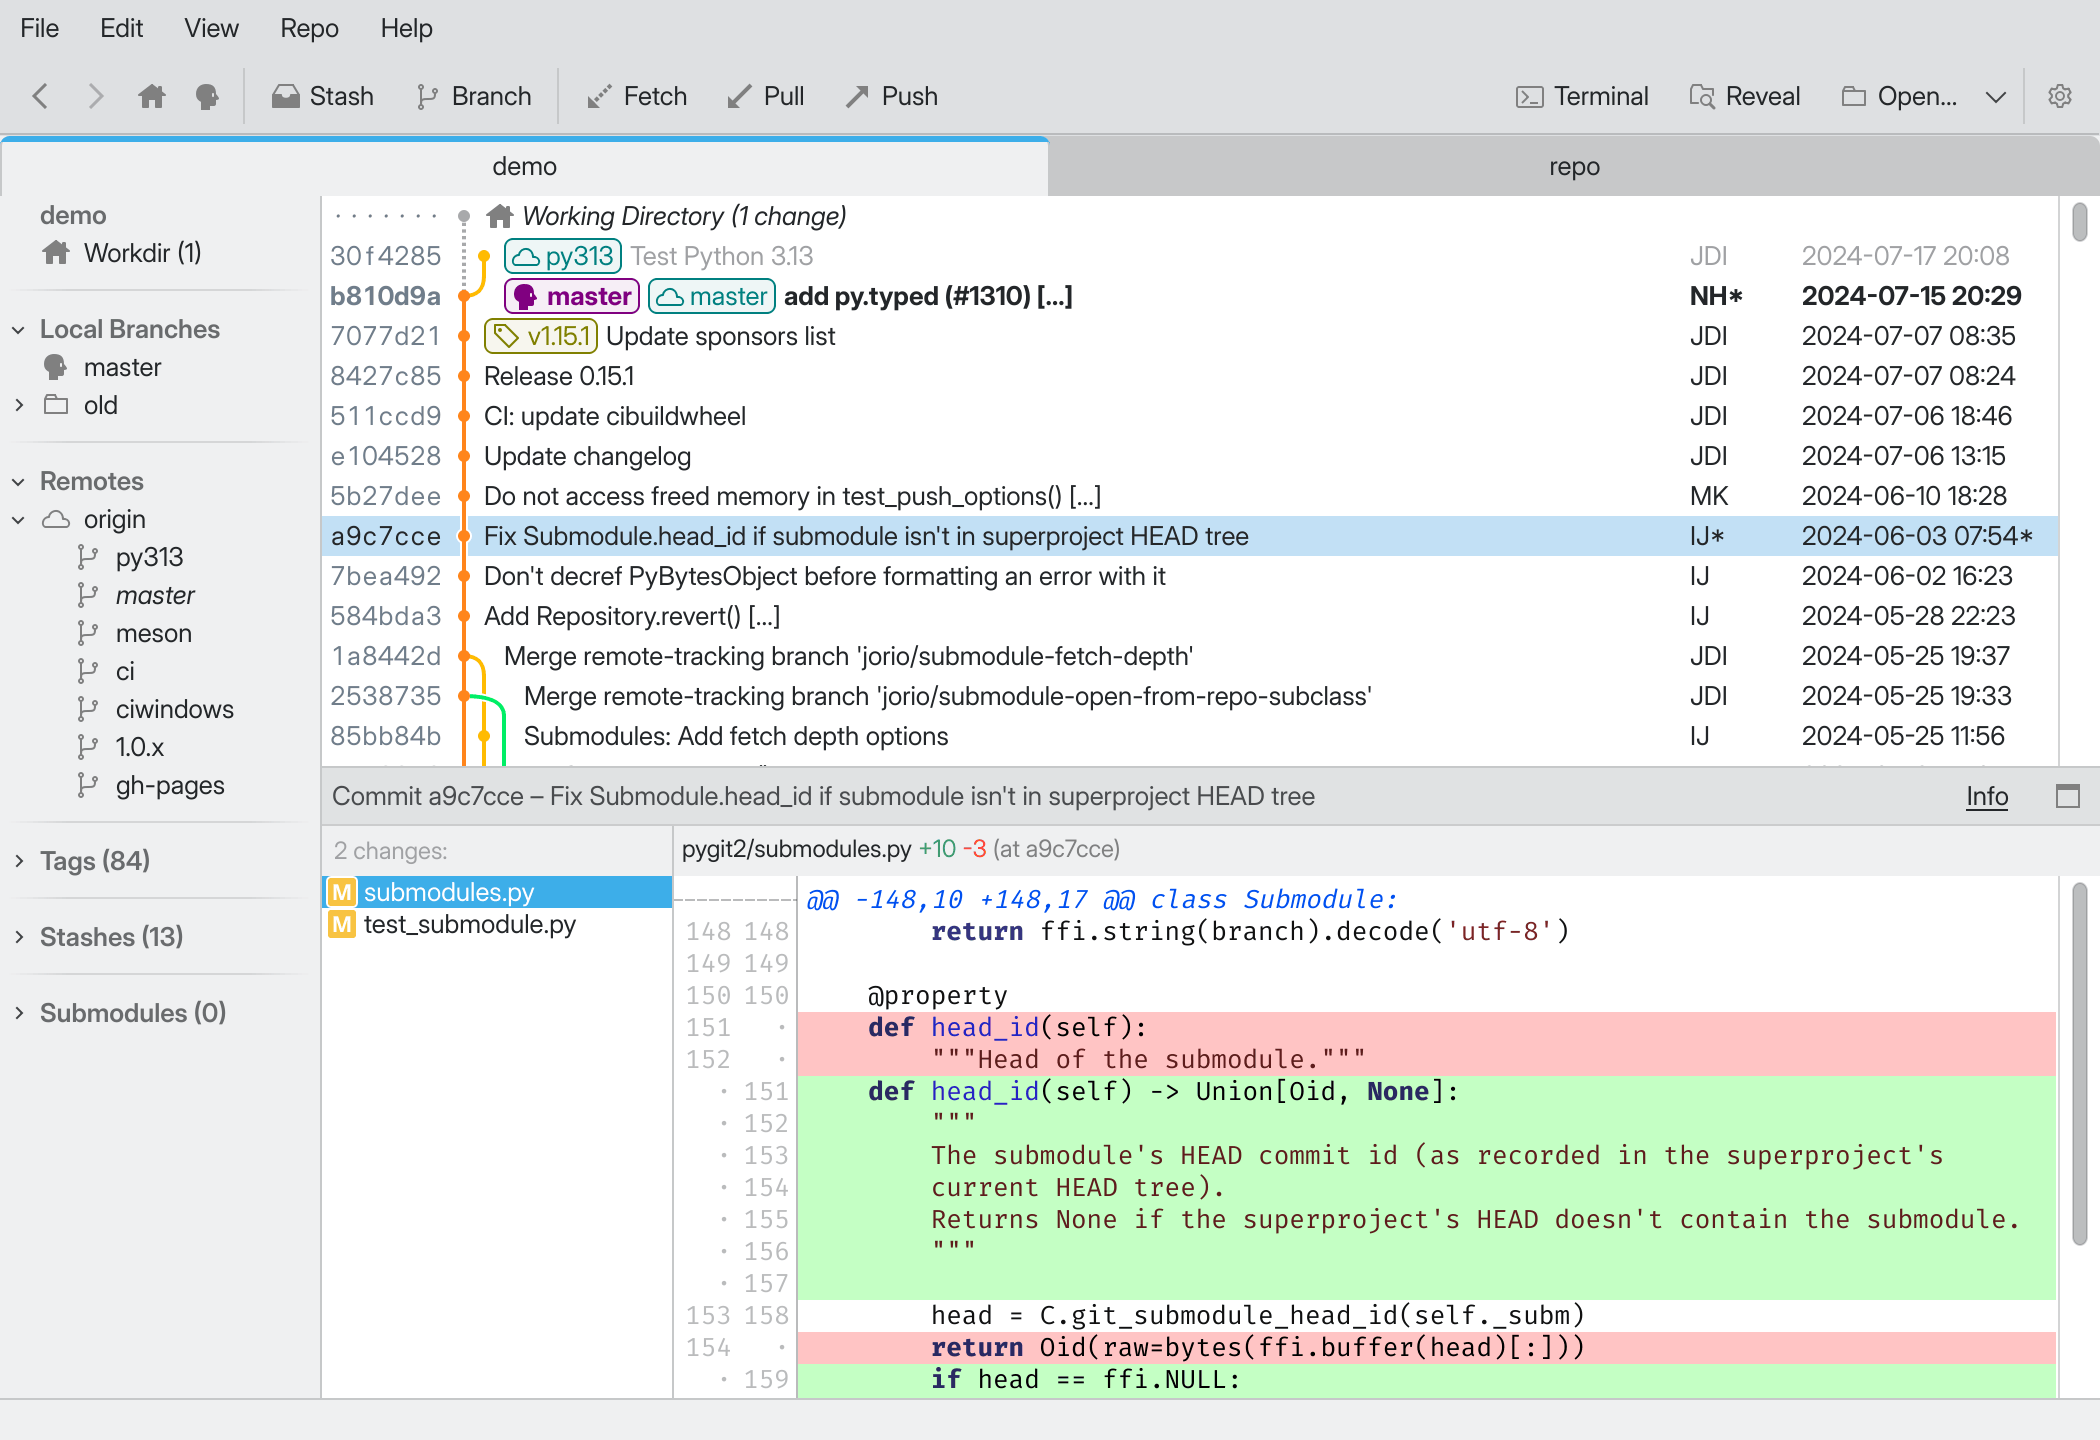
Tab Bar: Lets you switch between the open repositories in your session.
Commit History: A list of commits in the repository.
Sidebar: Lets you jump to various facets of your repository.
File List: Files modified by a commit; or list of files with uncommitted changes.
Diff View: Shows what’s changed in the selected file.
Status bar: Tells you if GitFourchette is busy with a long operation, otherwise displays helpful contextual hints.
Tab Bar
Use the tab bar to switch between multiple repositories.
GitFourchette remembers open tabs when you quit. It will automatically restore your tabs next time you launch it.
Double-click a tab to open the repo’s root directory in your file manager.
File List
The File List shows a list of modified files in the working directory or in a past commit. In the File List, you can:
Left-click on a file to show its changes in the Diff View.
Right-click on a file to perform actions on it. Those depend on whether you’re exploring a past commit or preparing a new commit.
Hover over a file to reveal a tooltip with more details about it.
Each file is adorned by a little icon describing its status:
|
|
|
|
|
|
Commit History & Diff View
Those elements warrant dedicated chapters:
Handy shortcuts
Tip
Exploring the Commit History
The Commit History displays a list of commits in the repository, along with a graph to visualize how the branches evolve.
You can left-click on any commit to
explore its contents,
or
right-click to perform an action with the commit.
Tip
Press Alt 2 to get keyboard focus on the Commit History.
Overview of the Commit History
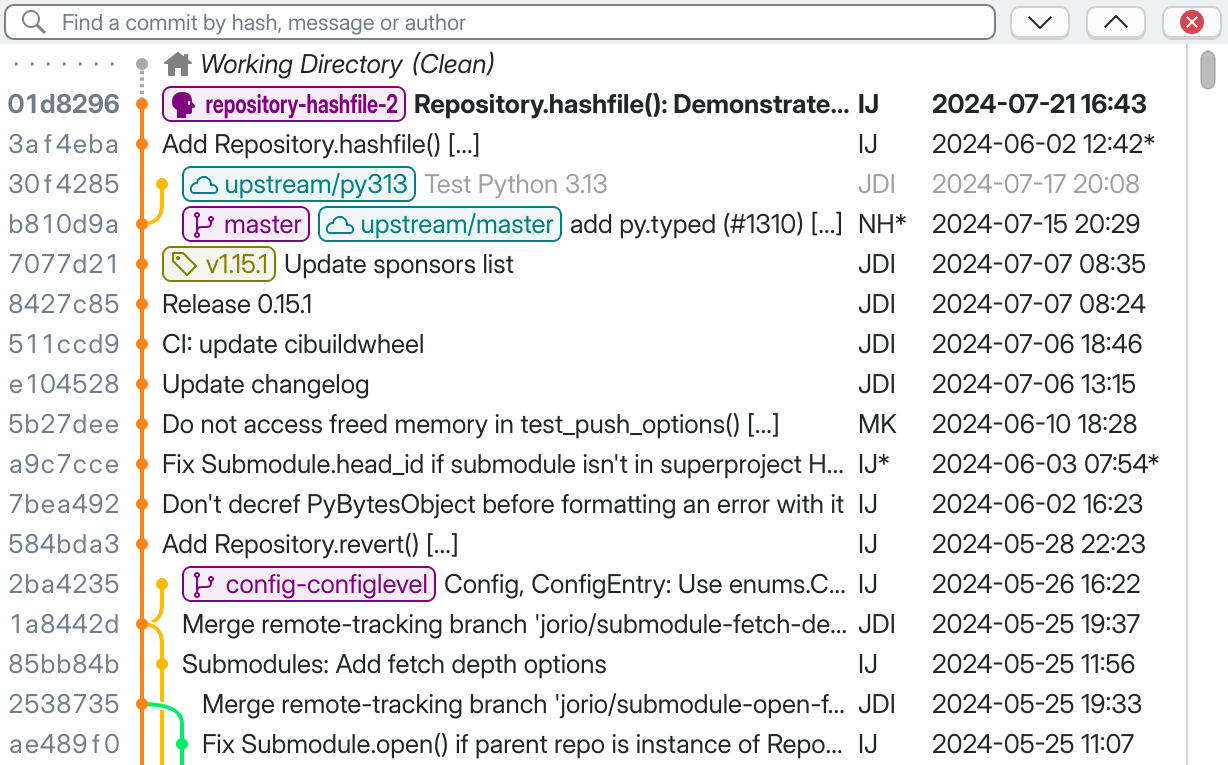
Hash: The first few characters of the commit’s SHA-1 hash. It uniquely identifies the commit.
Graph: A visualization of the branches at this point in history. The dot represents the commit itself.
- Ref Boxes: Colored boxes shown for each reference to this commit by:
The tip of a local branch, in purple, e.g.

The tip of a remote branch, in teal, e.g.

Tags, in yellow, e.g.

Commit Summary: The first line of the commit message. An ellipsis (…) indicates that the message is truncated; hover over it to reveal the full message in a tooltip.
Author Name/Date: Who created the commit and when. See Author vs. Committer.
Search Bar: Bring it up with Ctrl F when the Commit History has keyboard focus. See Finding a commit.
Note
You can customize the appearance of some of these items in
.
For example, you can tweak:
Author column: full name, last name only, initials, email, etc.;
Date/time formats: ISO, U.S., European, etc.;
Row spacing and alternating background color…
Finding a commit
The Commit History has a Search Bar.
Press Ctrl F to invoke it (the Commit History must have keyboard focus).
Start typing, and a yellow highlight will appear in matching commits.
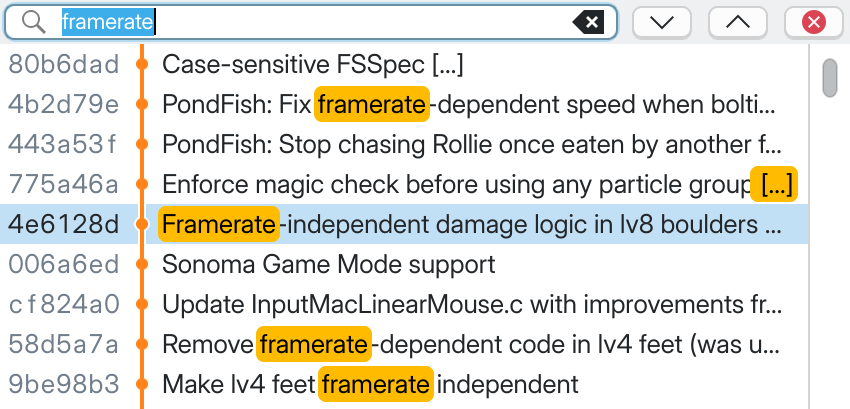
Searching for a word in the Commit History.
You can search for:
The first couple characters of a commit’s SHA-1 hash.
Any part of a commit message. If the search term is found beyond the first line of the message, the ellipsis (…) will be highlighted in yellow.
A commit’s author name.
Tip
Note
Search is limited to the commits loaded in memory.
To find an old commit in a long-lived repository, you may want to review
.
Exploring the changes in a commit
Once you’ve selected a commit in the Commit History, the lower half of the main window is dedicated to exploring the contents of the commit.
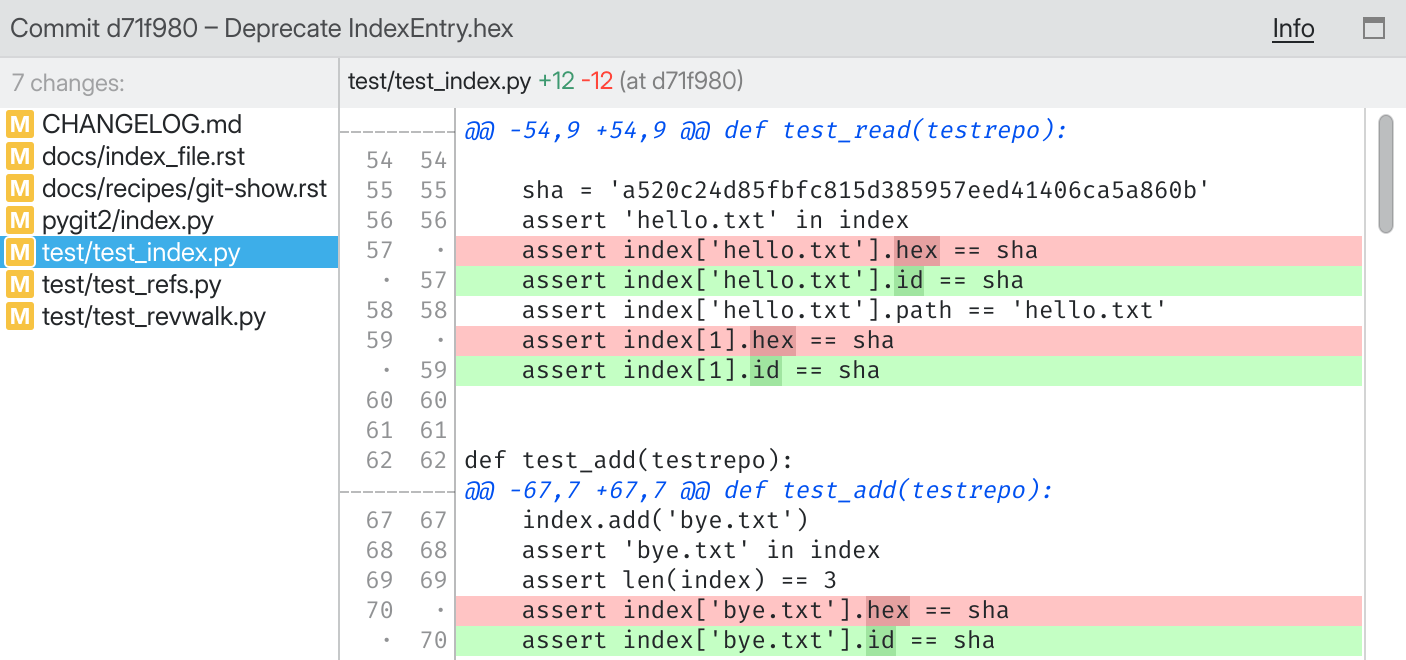
- Header: The first line in the commit message.Click Info to view detailed metadata about the commit.Click the
maximize button to expand the Commit Explorer.
- File List: All files modified by this commit in relation to its parents.
Left-click on a file and the Diff View will show what’s changed in it.
Right-click on a file to open a context menu with advanced operations.
- Diff View: Displays the changes introduced by the commit in the selected file.The Diff View is covered in detail in its own chapter: Reading and Editing Diffs.
Returning to an item you’ve previously visited
As you navigate your repository, GitFourchette keeps track of where you’ve been. Much like a Web browser, you can go “back” and “forward” among the items you’ve viewed recently.
To return to an item you’ve previously visited, use the Back
and
Forward buttons in the Tool Bar, or press
Ctrl ← and Ctrl →. You can also use your mouse’s back/forward buttons.
Advanced: Chronological vs. Topological sorting
Out of the box, the Commit History displays commits in chronological order.
You can switch to topological sorting in
.
Chronological mode lets you stay on top of the latest activity in the repository. The most recent commits always show up at the top of the graph. However, the graph can get messy when multiple branches receive commits in the same time frame.
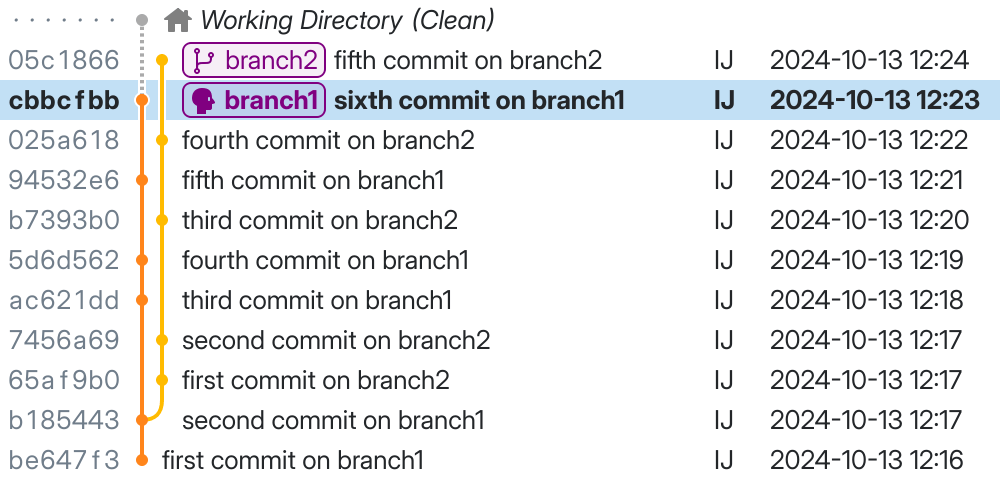
Chronological mode. New commits trickle into the graph in the exact order they are being made, but the intertwining of branches can get messy.
Topological mode makes the graph easier to read. It attempts to present sequences of commits within a branch in a linear fashion. Since this is not a strictly chronological mode, you may have to do more scrolling to see the latest changes in various branches.
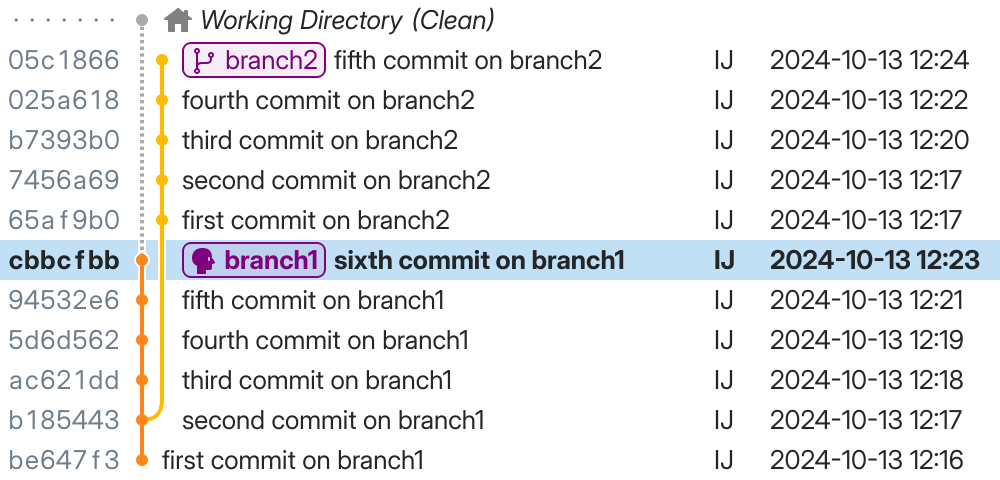
Topological mode. Commits are neatly grouped according to the branch they belong to, but chronology isn’t respected across different branches.
Making a Commit
This chapter will teach you to create your own commits with GitFourchette.
Crash course: What’s in a commit?
The contents of a Git repository evolve through a series of commits. A commit is a record of the state of the files in the repo.
More practically, you can think of a commit as a small milestone in your work on the repository: do some work, then commit your work when you’re ready to move on to another task.
In practice, creating a commit entails:
Making some modifications to files in the repository (outside GitFourchette);
Vetting which file modifications to include in the commit (this is called staging the files);
Composing a short message that describes the changes since the previous commit.
When you’ve just finished making the commit, it becomes the HEAD commit—meaning that it’s at the tip of the current branch.
Each commit is identified by a unique SHA-1 hash of its contents and metadata (parents, message, author). Because of this unique hash, commits are immutable: the slightest modification to an existing commit would result in a different hash, and thereby a different commit.
Jumping to the Working Directory
In GitFourchette, you can prepare commits from the Working Directory. You can get there:
From the Sidebar: Click
Working Directory.
From the Commit History: Click
Working Directory at the top of the history.
From anywhere: Press Ctrl G (think “Go” to workdir).
The Working Directory displays any files that have changed since the HEAD commit:
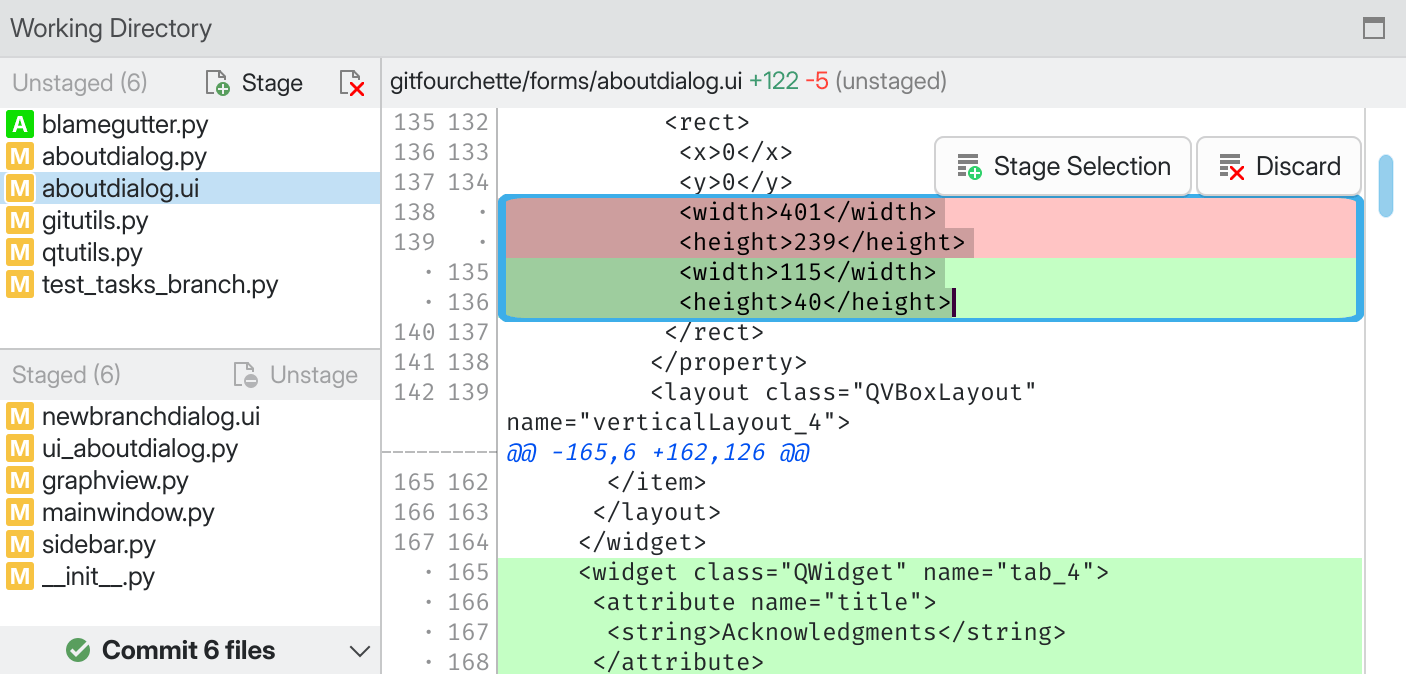
Unstaged Changes: List of files that have changed since the HEAD commit, but that you haven’t staged for commit yet.
Staged Changes: List of changed files that are ready to be committed.
Diff View: Displays the differences in the selected file between your working version and the state of this file at the HEAD commit.
Note
The number of uncommitted changes is shown next to
Working Directory in the Sidebar.
Staging and unstaging files
After you’ve made some changes to files in the repository (outside of GitFourchette), the modified files show up in the Unstaged box.
To prepare a commit, you must decide which of these files to include in the
commit—this is called staging the files. Select some files, then press the
Stage button. Notice that the files
you’ve staged have moved to the Staged box.
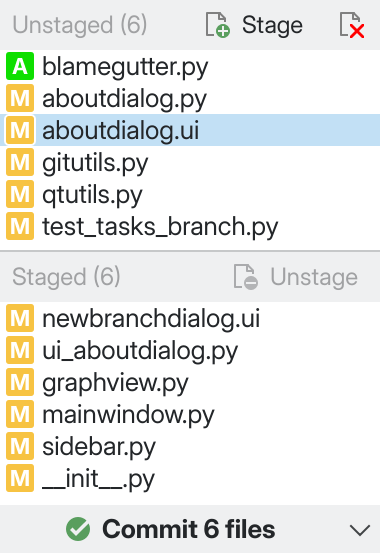
The staging area, with some files ready to be committed.
If you change your mind about staging a file, select it in the
Staged box, then click Unstage.
The file will move back to the Unstaged box.
To get rid of an unwanted modification in the Unstaged box, select
the unstaged file and click Discard.
(You can rescue changes that you’ve discarded by mistake.)
When you’re satisfied with your selection of staged files, click the large
Commit files button. This brings up the Commit
dialog where you can describe your commit and finalize it.
Tip
Finalizing the commit (the Commit dialog)
Clicking the Commit files button in the main window
brings up the Commit dialog, where you’ll be able to type up a commit message
then confirm the commit.
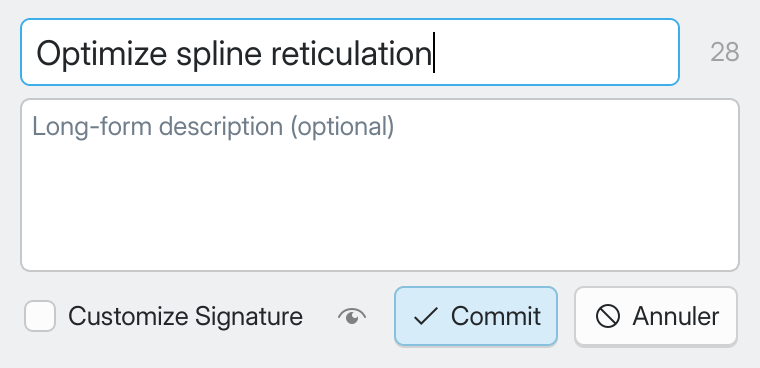
The Commit dialog.
A commit message consists of:
A mandatory summary line. Describe your changes in a few words so other people—including future you—can learn what your commit is about at a glance. Keep it concise: proper Git etiquette mandates to keep the summary under 50 characters and to avoid going over 72. (The character counter beside this field can help you stick to this guideline.)
An optional long-form description. Feel free to provide as much context for your changes as necessary in this field.
When you’re ready, click Commit—and you’re done!
Notice your new commit in the Commit History: the HEAD branch now points to it, e.g.  .
.
Your commits are local until you push them
So, you’ve created a commit. But it’s just sitting on your machine, for now—GitFourchette doesn’t send it to any remote servers automatically.
Notice that right after creating a commit, your HEAD branch has moved to your
new commit ( ) but the remote server
hasn’t budged (
 ).
).
This is nice, because it gives you a chance to amend your commit before anyone knows you’ve made a mistake in it.
Once you’re satisfied with your work, push your branch to a remote so the world can see what you’ve been working on.
Managing Changes in the Working Directory
This chapter will teach you some techniques to manage and edit your uncommitted changes so you can prepare commits with more precision. We’ll assume you’re already familiar with staging and unstaging files (see Making a Commit).
Staging and discarding individual hunks or lines
Sometimes, you might be ready to commit specific parts of a file—but you might still be working on other parts of that file.
Fortunately, you don’t have to stage the entire file every time you want to make a commit. The Diff View lets you stage small pieces of code in a file:
You can stage a single hunk without staging the full file.
You can even stage individual lines if a hunk isn’t granular enough.
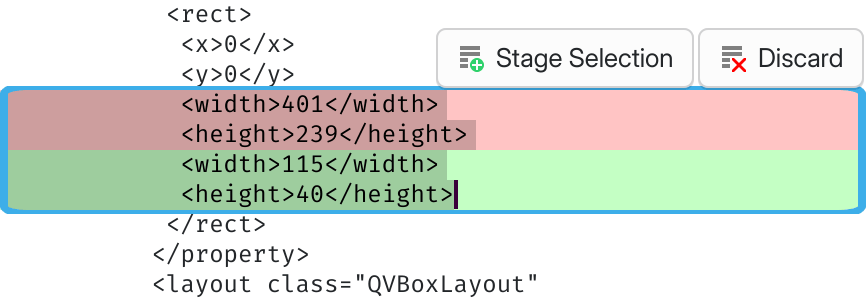
Hand-picked lines ready to be staged in the Diff View.
Stashing changes
If your working directory contains changes that you’re not ready to commit yet, you can stash them. Stashing safely tucks away your changes to a stash, then it restores the affected files to their unchanged state. When you’re ready to resume working on the stashed changes, you can apply the stash back to your working directory.
This is handy when you want to reset your working directory to a clean slate without losing work in progress.
To create a stash, go to ; or, select some files in the File List, right-click and choose Stash Changes. This opens the “New Stash” dialog where you can customize the contents of the stash before confirming:
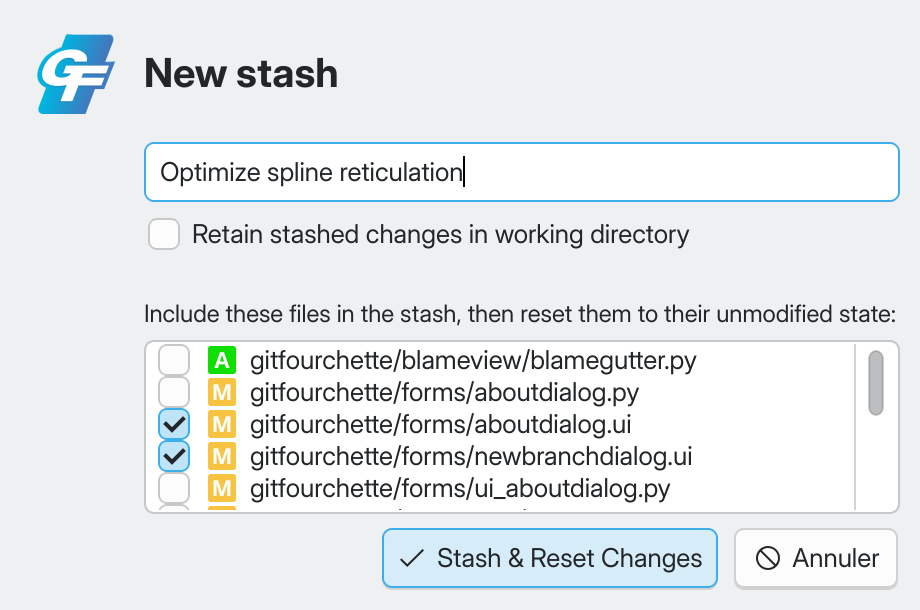
The New Stash dialog.
Item |
Description |
|---|---|
Optional stash message |
Describe the contents of your stash here. Or not—it’s up to you. Stashes are meant to be temporary, so this message is optional. |
Retain stashed changes in working directory |
Unticked by default, since the most common use case for stashes is to set aside some work in progress and clean up your working directory. Tick this if you want to stash the changes and keep them in your working directory anyway. |
Files to stash |
Select the files to include in the stash. Unticked files will not be part of the stash and will remain in your working directory. |
Your new stash appears in the Sidebar’s Stashes
section. To restore a stash to your working directory, right-click on it in the
Sidebar and choose Apply.
Warning
If you stash a file that contains both staged and unstaged changes, those will be “flattened” in the stash.
Note
Stashes are only saved locally on your machine. They cannot be shared with others (unlike “shelves” in Perforce).
Tip
Press Ctrl Alt S to create a new stash.
Rescuing changes that you discarded by mistake
Did you mistakenly Discard some change
that you actually meant to keep?
Don’t panic—GitFourchette backs up the last 250 discarded changes by default. Go to and your system’s file manager will reveal the trash folder.
In the trash, discarded changes are stored as .patch files that you can apply to your working directory. To do so, drag-and-drop a patch file from your file manager to GitFourchette’s main window.
Applying the patch might fail if your working directory has evolved too much. In this case, try applying the patch with git apply (unfortunately, GitFourchette’s patcher is a bit brittle for now and vanilla git apply is more robust).
Note
You can customize how many files to keep in the trash in .
Reading and Editing Diffs
The Diff View shows the evolution of a file between two revisions.
It also gives you powerful tools to help you prepare commits with more precision. You can use it to stage or discard pieces of code at finer levels than the entire file.
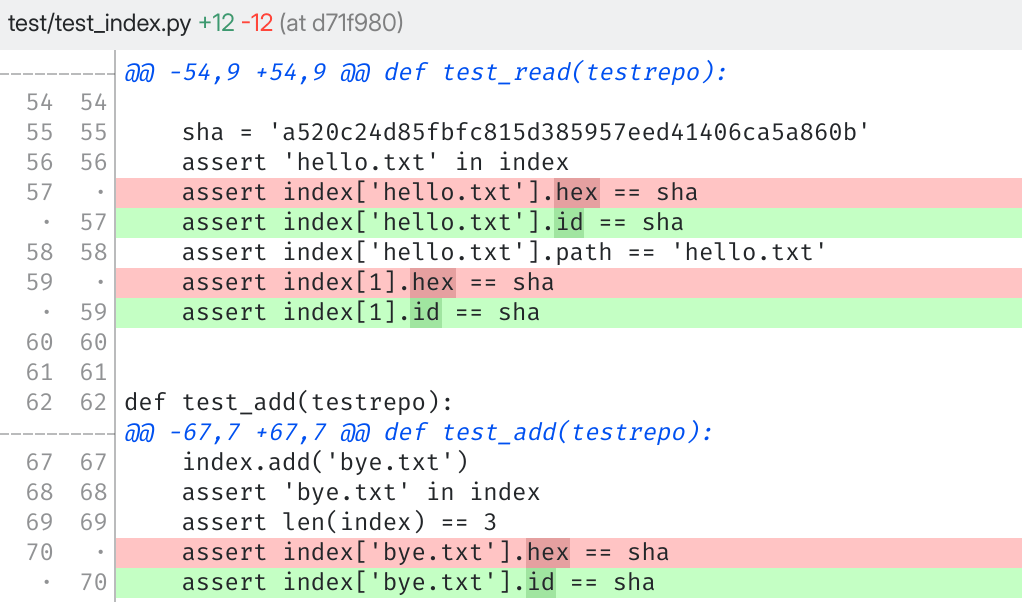
The Diff View.
Tip
Press Alt 4 to get keyboard focus on the Diff View.
Old and new revisions
The Diff View compares an old revision of a file to a new revision of the same file.
Depending on where you’re diffing the file, the old and new revisions being compared vary:
Diffing a file in: |
“Old” revision is: |
“New” revision is: |
|---|---|---|
An unstaged change |
From the index |
From your working copy |
A staged change |
At the HEAD commit |
From the index |
A commit from the history |
Before the commit |
At the commit |
What’s in a hunk?
The Diff View only displays the sections of the file that have been modified. These sections are called hunks.

A sample hunk.
Each hunk consists of:
A header line starting with @@, detailing the line numbers affected by the hunk. It’s shown in blue.
A couple of context lines, which don’t change in either revision of the file. They’re a visual aid to help you situate the hunk in the file. These are shown in black and white.
- In between the context lines, the meat of the hunk—a block of modified lines:Red lines represent deletions. (They’re gone from the new revision.)Green lines represent additions. (They appeared in the new revision.)
Note
Are you red/green colorblind? Switch to a yellow/blue color scheme in
.
Manipulating hunks
The power of the Diff View is that you can stage and unstage individual hunks without staging or unstaging the entire file.
Right-click on a hunk to reveal these actions:
Item |
Available in |
Description |
|---|---|---|
Stage Hunk |
Unstaged change |
Stage just this hunk; leave other changes alone |
Discard Hunk |
Unstaged change |
Discard just this hunk; leave other changes alone |
Unstage Hunk |
Staged change |
Unstage just this hunk; leave other changes alone |
Revert Hunk |
Past commits |
Undo the changes in this hunk (reversal applied to your working copy) |
Export Hunk As Patch |
Anywhere |
Save a patch file containing only this hunk in “unified diff” format |
Note
If you’re not seeing hunk-related actions, make sure your text selection is empty.
Manipulating individual lines
If hunks aren’t granular enough for you, you can even manipulate diffs line-by-line.
Select a piece of code with your mouse in the Diff View. Notice the blue outline surrounding the actionable lines:

Blue outline around selected lines in the Diff View. (Color may vary on your system.)
Right-click on a line selection to reveal similar actions as the hunk
context menu, only these will just apply to your picked lines:
Item |
Available in |
Description |
|---|---|---|
Stage Lines |
Unstaged change |
Stage just these lines; leave other changes alone |
Discard Lines |
Unstaged change |
Discard just these lines; leave other changes alone |
Unstage Lines |
Staged change |
Unstage just these lines; leave other changes alone |
Revert Lines |
Past commits |
Undo the changes in these lines (reversal applied to your working copy) |
Export Lines As Patch |
Anywhere |
Save a patch file containing only these lines (plus a couple context lines) in “unified diff” format |
Tip
The gutter
Attached to the left side of the code, the gutter displays line numbers in the old and new revisions (left and right columns, respectively).
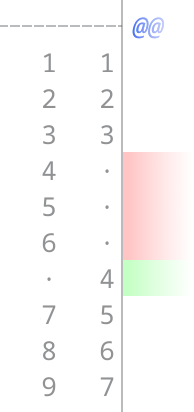
The gutter beside a code hunk. This hunk covers old lines #1-9 (left) and new lines #1-7 (right). Old lines #4-6 were deleted, and new line #4 was added in their place.
As you hover over a line in the gutter, notice that your cursor flips over
( ). This indicates that
 left-clicking
there will select the entire corresponding line in the diff.
To select multiple lines, click on the gutter and drag your mouse to expand the selection. You can also just click on one line, then Shift-click on another line to select all the lines in between.
Some special lines can be double-clicked to select blocks of code effortlessly:
Double-click the dashed line next to a hunk header to select the entire hunk.
Double-click the line number for a red or green line to select adjacent red/green lines around it.
Once you’ve selected lines from the gutter, you can right-click to access
the usual line selection actions (stage, discard, etc.).
Managing Your Branches
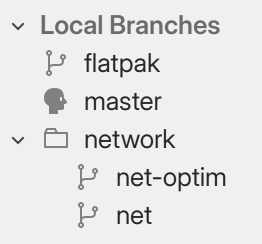
Local branches in the Sidebar.
“master” is checked out.
All of the local branches in your repository are listed under
Local Branches in the sidebar
(or just Branches if the sidebar is narrow).
A little head is shown next to your current HEAD branch,
i.e. the currently checked-out branch.
Tip
Press Ctrl H to jump to the HEAD.
Creating a new branch
You can start a new branch from several places:
From the Commit History: Right-click on any commit, then select New Branch Here.
From the Sidebar: Right-click on any local or remote branch, then select New Branch Here.
From the Tool Bar: Click the
Branch button to start a branch off the HEAD commit.
After you’ve triggered one of the actions above, the “New Branch” dialog will let you set up the branch:
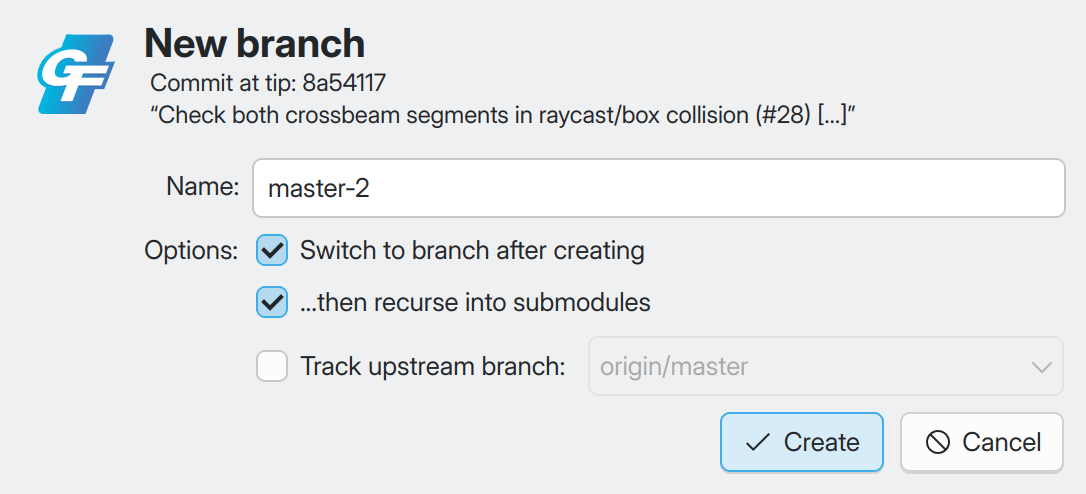
The New Branch dialog.
Item |
Description |
|---|---|
Name |
You can name your branch however you want, bar some restrictions. GitFourchette will let you know if the name you’ve entered isn’t compliant. |
Switch to branch after creating |
Tick this to switch to the new branch after creating it. Otherwise, the repository will remain on the current branch. |
…then recurse into submodules |
Tick this to update the submodules after switching to the new branch. (Only available if your repository uses submodules.) |
Track upstream branch |
If a remote branch points to the target commit for the new branch, you can make it the upstream for the new branch. (You can always change the upstream later.) |
Tip
Press Ctrl B to create a new branch on the current HEAD commit.
Switching to another branch
You can switch to another branch from the Sidebar, or from the Commit History.
From the Sidebar,
double-click any local branch. You will be asked to confirm the switch. If your repository has any submodules, you will also be asked whether to update them.
From the Commit History,
double-click a commit that is the tip of a local branch (these commits are adorned with a purple box – e.g.
 ).
This brings up the “Check out Commit” dialog, which lets you confirm the switch.
After switching to another branch, notice that the HEAD branch
has changed in the Sidebar, as well as in the Commit History (e.g.
 ).
).
Note
You can’t switch to a remote branch. To achieve something similar, you can create a local branch that tracks the remote branch, then switch to it: right-click on the remote branch in the Sidebar then select New Local Branch Here.
Merging another branch into yours
You can merge any local or remote branch into your current branch:
From the Sidebar: Right-click on the branch you’d like to merge from, then select Merge into (current branch).
From the Commit History: Right-click on the tip of the branch you’d like to merge from, then select Merge into (current branch).
GitFourchette will attempt to fast-forward your current branch to the branch you’re merging from. This avoids creating a merge commit.
If fast-forwarding isn’t possible, GitFourchette will ask you to resolve the merge conflicts. hen, conclude the merge by creating a merge commit. Read Resolving Merge Conflicts for more details.
Organizing your branches in folders
Your local branches can be organized in folders.
Just like paths in a file system, GitFourchette treats the slash character
/ in a branch name as a “folder separator”.
For example, if your repository contains branches foo/branch1,
foo/branch2 and foo/branch3, then GitFourchette will group
all three of these under the folder foo.
Note
Folders are automatically inferred from the names of your branches; you can’t “create” folders per se. To conjure up a new folder, rename one of your branches, and insert a slash / in its name: e.g. rename mybranch to newfolder/mybranch.
Folders can be nested. The sidebar will combine chains of nested folders when possible.
Right-click on a folder to open a context menu
that will let you act on all branches within it. You can:
Action |
Description |
|---|---|
Rename Folder |
Rename the part preceding “/” for all branches in the folder. |
Delete Folder |
Delete all local branches in the folder. |
Hide Folder |
Hide all branches in the folder from the commit history. |
Hiding branches in the Commit History
You can hide any branch from the Commit History.
Move your mouse pointer over one of the branches in the Sidebar and an eye icon
() will appear. Click it, and the branch will be hidden
from the graph, as indicated by a crossed-out eye icon (
).
To unhide the branch, click the eye icon again.
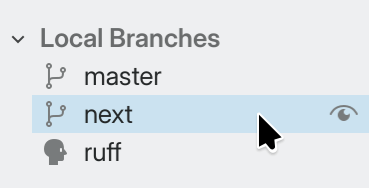
Hovering over a branch in the Sidebar.
Note
Even if you hide a branch, it may still be shown in the Commit History if another visible branch points to the same commit.
New in v1.3.0: You can also show a single branch and hide
all others. Move your mouse cursor over the eye icon in the sidebar, then
middle-click it. An inverted eye icon () will
appear, indicating that the graph only displays this one branch.

Hiding all but one branch.
Fetch, Pull & Push: Syncing Branches With Remotes
Setting an upstream branch
Fetch and Pull are operations that synchronize a local branch with a remote branch.
Before you can Fetch or Pull a local branch, you must bind it to a remote branch. That remote branch is then said to be the upstream for the local branch.
You can change a local branch’s upstream at any time, even after the branch has been created. To do so, right-click on the local branch in the Sidebar and select Upstream Branch; a submenu appears, revealing all known remote branches. Pick the desired remote branch to set as the new upstream.
You can also clear the upstream reference with Stop tracking upstream branch under the same submenu; Fetch and Pull will stop working on this branch.
Note
If the remote branch you’re looking for is missing from the
Upstream Branch submenu, your remote-tracking branches might be
out of date. Right-click on the remote in the
Sidebar and select Fetch All Remote Branches, then see if the
expected remote branch comes up.
Note
Unlike Fetch and Pull, Push doesn’t require the local branch to have an upstream.
Fetching new commits on a branch
The “fetch” operation downloads new commits from the remote server. It updates remote-tracking branches only; your local branches are left intact. After a fetch, you can look at the new commits in the Commit History and decide whether you want to merge them into your local branch.
You can fetch any local branch that has an upstream. Right-click on the local branch in the Sidebar, then pick Fetch (upstream name). (If Fetch is grayed out, select an upstream first.)
You can also fetch a remote-tracking branch directly: right-click on it the Sidebar, then pick Fetch New Commits.
You can update all remote-tracking branches at once for any given remote: right-click on the remote in the Sidebar, then pick Fetch All Remote Branches.
Pulling new commits into your branch
The “pull” operation fetches the latest commits from a remote branch, then it integrates them into your local branch, via a merge commit if necessary.
Pulling is only possible on the currently checked-out branch, and it must have an upstream.
To pull the current branch, click Pull in the
Tool Bar.
Pulling has one of three outcomes:
Remote branch has no new commits: GitFourchette will tell you that your branch is already up-to-date.
Remote branch has new commits: GitFourchette will fast-forward your branch to the remote branch.
Remote branch has diverged from your local branch: A merge is necessary to reconcile your branch with the remote. You will be asked to resolve the merge conflicts, and conclude the merge by creating a merge commit. (See Resolving Merge Conflicts for more information.)
In any case, GitFourchette will tell you what needs to be done to complete the pull, and you’ll have a chance to confirm or cancel.
Tip
Press Ctrl Shift P to pull the current branch.
Pushing a branch to a remote
The “push” operation uploads your commits on a branch to the remote repository.
You can push any local branch, even if it’s not assigned an upstream:
From the Sidebar: Right-click the local branch you’d like to push, then select Push.
From the Tool Bar: Click
Push to push the currently checked-out branch.
The “Push Branch” dialog appears, where you can review the parameters before proceeding:
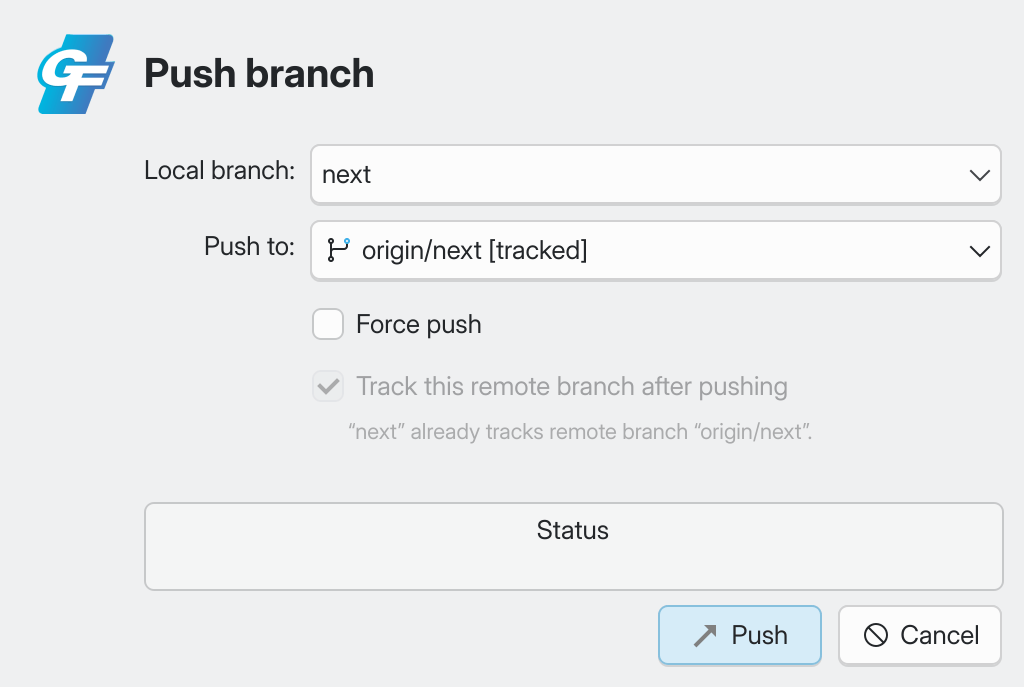
The Push Branch dialog.
Item |
Description |
|---|---|
Local branch |
Select which branch to push among all the local branches in your repository. By default, your current branch is selected. |
Push to |
By default, the local branch’s upstream is automatically selected. But you don’t have to push to the upstream: you can select any remote branch to upload to. You can even create a whole new branch on the remote. |
Force push |
USE WITH EXTREME CAUTION—May cause data loss! If your local branch has diverged from the remote branch, the remote server will reject the push. Force push lets you bypass this restriction and overwrite the remote branch with the contents of your local branch. |
Track this remote branch after pushing |
Tick this to set the local branch’s upstream to the remote branch you selected for Push to. (Grayed out if the selected remote branch is already the upstream.) |
Status |
This box displays network information during the push. |
After a successful push, notice that the remote branch now points to the same
commit as your local branch.
The Commit History displays the tip of a remote
branch with a teal box, which you should now see next to the purple box
for your local branch. (e.g.  ).
).
Warning
Don’t tick “Force Push” unless you really know what you are doing! Force-pushing is generally frowned upon because it rewrites history for other users of the remote. This might mess up your teammates’ workflow and/or cause data loss!
Tip
Press Ctrl P to push the current branch.
Managing Remote Servers and Remote-Tracking Branches
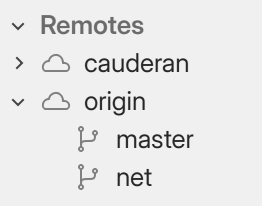
Remotes in the Sidebar
All of the remote servers added to your repository are listed
under Remotes in the sidebar.
In turn, remote-tracking branches are listed under their respective remotes.
Adding a new remote
Right-click on Remotes in the sidebar and select Add Remote (or just double-click on Remotes) to bring up the “Add Remote” dialog:
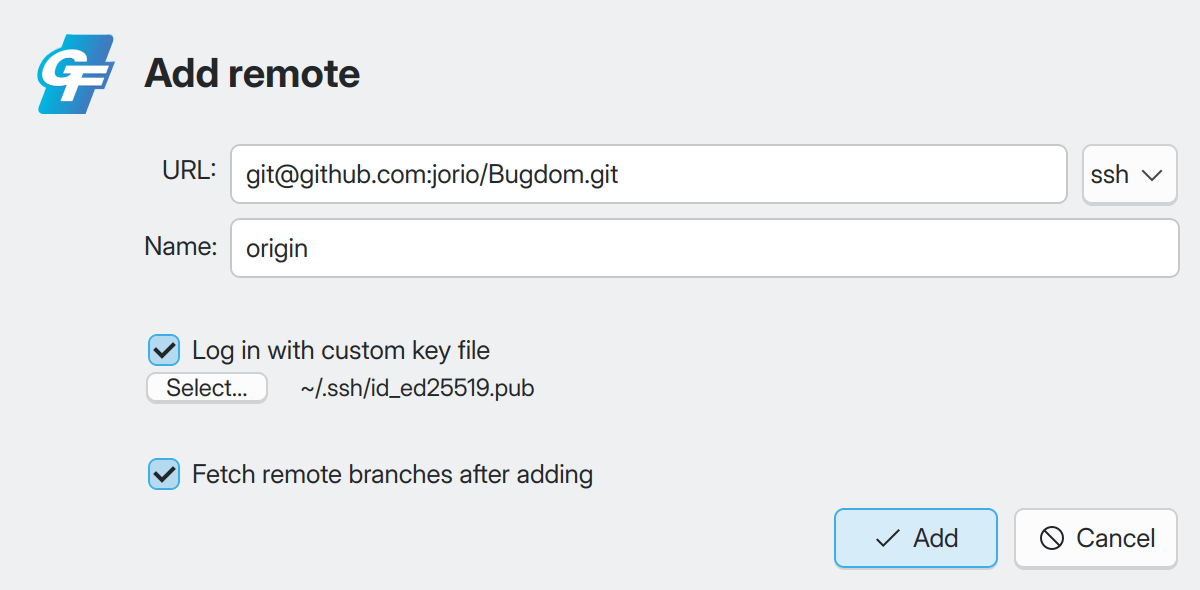
The Add Remote dialog.
Item |
Description |
|---|---|
URL |
The URL will be used to fetch from, and push to, this remote. GitFourchette automatically fills in the URL from your clipboard if possible. You can use the ssh/https button to convert the URL to another protocol. |
Name |
You can name the remote however you want, bar some restrictions. GitFourchette will let you know if the name you’ve entered isn’t compliant. |
Advanced Commit Techniques
Setting aside your commit message for later
If you back out of the Commit dialog by clicking Cancel, GitFourchette will save your message as a draft. The draft message is shown in the Working Directory row at the top of the Commit History.

A commit message draft as shown in the Commit History.
Next time you press the Commit files button,
the Commit dialog will fill in the commit message with your draft.
To clear the draft message, right-click Working Directory in the Commit
History, then choose Clear Draft Message.
Amending a commit
If you’ve just made a commit and you realize you’ve made a mistake in it, you can amend the commit. Amending updates the contents and/or metadata of the HEAD commit.
Warning
Attention Beginners! Use “amend” ONLY on a commit that you haven’t pushed yet! If you’ve already pushed a commit to a remote, DON’T AMEND IT and fix your mistake in a new commit instead.
GitFourchette won’t stop you from amending a commit that has already been pushed, because this is a legitimate use case if you really know what you’re doing. However, you run the risk of the remote rejecting your amended commit next time you push. And while force-pushing is an option, it’s extremely dangerous because it may cause data loss in your repo or for your teammates.
If you’re at all unsure, steer clear of the Amend feature until you’re more confident with Git.
To amend the HEAD commit:
First, stage any additional changes you’d like to roll into the HEAD commit. (If you simply want to edit the HEAD commit’s message, you can actually leave the Staged box empty here.)
Click the pulldown arrow attached to the right of the
Commit files button. In the menu that appears, choose Amend latest commit. (Or just press Ctrl Shift S.)
The “Amend Commit” window appears. It’s very similar to the “Commit” dialog we’ve walked through earlier. One key difference is that “Amend Commit” fills in the message of the HEAD commit for you. You can leave it be, or you can edit it.
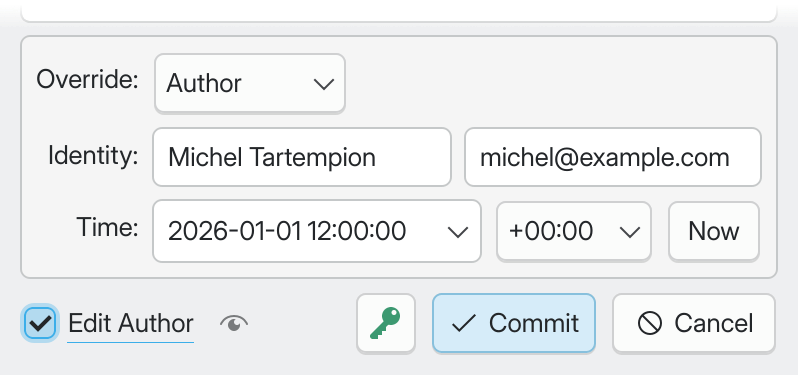
By default, the original commit’s author information will be left intact, but
the amended commit will automatically record you as the committer. You can
customize this via Edit Author and preview the result with the eye
button (, see Editing a commit’s author or committer).
Note
To be exact, amending doesn’t really modify the existing commit. Remember, commits are immutable: each commit is identified by a unique hash of its contents and metadata (message, author, etc.). So, amending actually produces a new commit, then rewrites history to “replace” the HEAD commit.
Cherry-picking a commit from another branch
Cherry-picking lets you bring a single commit from another branch into your current branch. This is useful to obtain changes from another branch without merging it in (when you’re not interested in the rest of the branch).
To cherry-pick a commit, locate it in the Commit History, right-click it and choose Cherry-Pick in the context menu. GitFourchette will apply the changes from the commit to your working directory.
Your repository will enter the special “cherry-picking” state, as shown by a banner below the Sidebar. In this state, some operations are restricted, so you should conclude the cherry-pick as soon as possible. To conclude the cherry-pick:
If cherry-picking was successful (as indicated by a green banner below the Sidebar), you should conclude the cherry-pick by committing the cherry-picked changes. GitFourchette encourages you to do so immediately after a successful cherry-pick.
If cherry-picking caused merge conflicts (as indicated by a yellow banner below the Sidebar), you will have to resolve the conflicts first. Read Resolving Merge Conflicts for more information.
Note
You’re free to stage additional changes before concluding the cherry-pick, for example if you need to adjust some code to the incoming changes.
If you change your mind, you can get your repository out of the “cherry-picking” state by clicking Abort Cherry-Pick in the Cherry-Picking banner.
Warning
Aborting a cherry-pick will discard all staged changes—whether they originate from the cherry-picked commit or not!
Signing Commits
Creating a signed commit
New in v1.5.0:
The key icon at the bottom of the Commit Dialog indicates whether your commit will be GPG-signed.
A green key means your commit will be signed.
A gray key means your commit will not be signed.
You can click the key icon to enable or disable signing for the commit you’re about to make.

The signing key button in the Commit Dialog.
After making a signed commit, you should see a green seal icon next to your name in the Commit History.
What to do if signing isn’t available
Note
To be able to sign commits, you must first set up user.signingKey in your Git configuration.
See Pro Git – Signing Your Work to get started.
Check that you’ve set
user.signingKeyin your Git configuration. This is required to specify what key to sign your commits with.If you’ve set up your signing key and you want all commits to be signed, check that you’ve enabled
commit.gpgSignin your Git configuration.
Verifying signed commits in the Commit History
New in v1.5.0:
To enable automatic verification of signed commits in the Commit History, go to and tick Verify signed commits on the fly.
As commits scroll into view, GitFourchette will then call git verify-commit automatically to verify their signatures.
The verification status is materialized by a seal icon next to the author’s name:
|
|
|
|
|
|
(No seal icon: Commit isn’t signed.) |
Troubleshooting failed verifications (“question mark” seal icons)
Your GPG keychain must contain the signer’s public key to be able to verify their commits.
Frequently, verification will fail () because GPG can’t find the signer’s public key in your keychain. You can import their public key from a trusted source, then force GitFourchette to verify the commit again (right-click on the commit and select Verify Signature).
Tip
You can try gpg --search-keys to import a key from your keyserver. For example, the following command lets you import a key owned by GitHub that is commonly used to sign commits made with their web interface:
gpg --search-keys B5690EEEBB952194
Resolving Merge Conflicts
What’s a merge conflict?
You may sometimes run into merge conflicts as you merge another branch into your current branch.
When a file has been modified on your branch, and you’re merging another branch that has made different changes to the same file, a merge conflict occurs. In this case, GitFourchette isn’t sure which version of the file to keep, so it’s up to you to resolve the conflict.
Once you’ve resolved all conflicts, you should conclude the merge by creating a so-called merge commit with the affected files (along with additional changes if necessary, for example to adjust the rest of your code to the incoming changes). You prepare that commit by staging files as usual, but the commit will have two parents instead of one.
In practice
When there’s a merge conflict, some operations in your repository will be restricted, such as making a commit or switching branches. So, it’s best to resolve the conflict as soon as you can.
As long as your working directory contains conflicted files, a yellow
“Merging” banner appears below the Sidebar, and the file lists in the Working
Directory show pending conflicts with a question-mark icon ().
Select one of the conflicting files, and a Conflict View appears in lieu of the
usual Diff View.
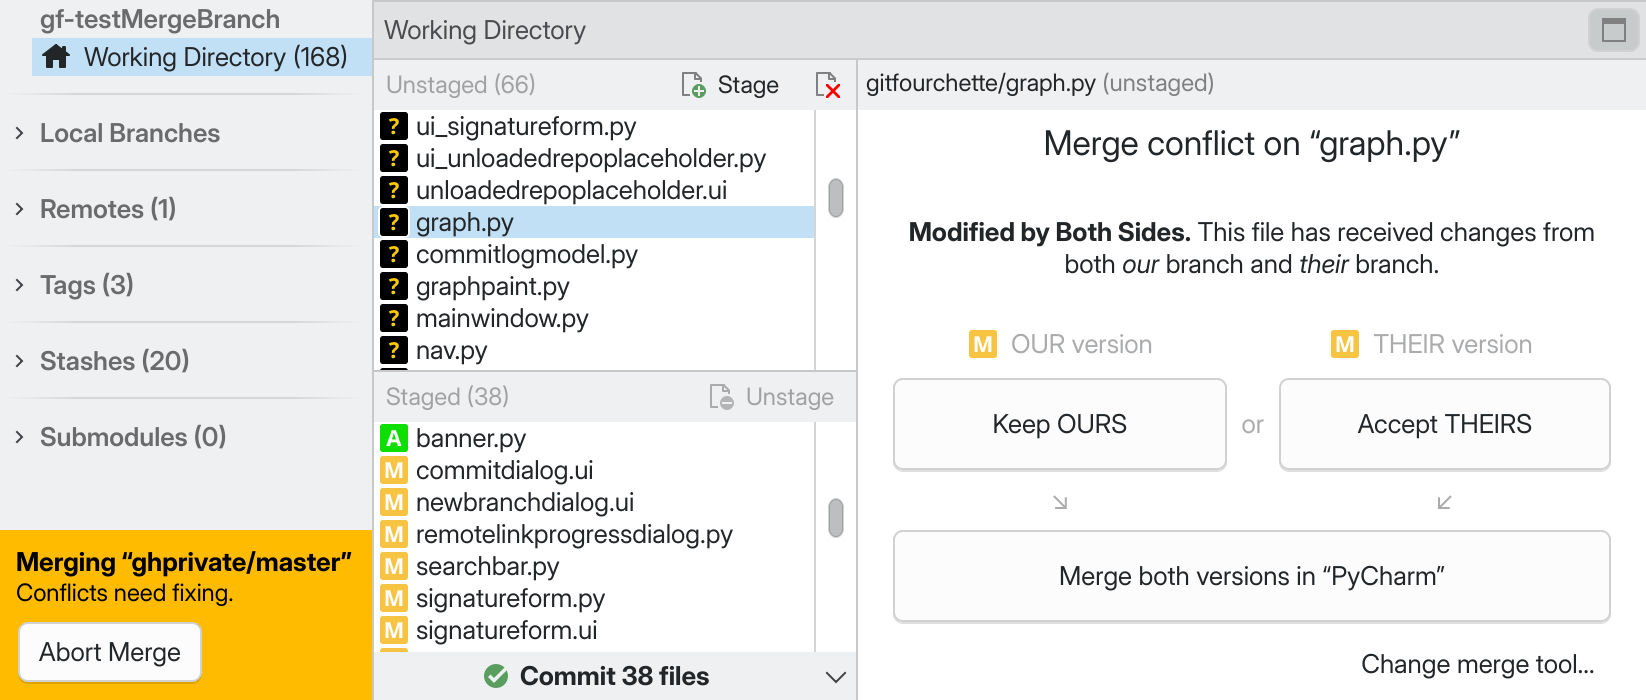
Sample merge conflict.
In a merge conflict, the current version of the file is referred to as “ours”, and the incoming version (from the branch being merged) is “theirs”.
From the Conflict View, you can resolve the conflict in one of three ways:
Choice |
Description |
|---|---|
Keep OURS |
Reject incoming changes. The file won’t be modified from its current state in HEAD. |
Accept THEIRS |
Accept incoming changes. The file will be replaced with the incoming version. |
Merge both versions |
Note
The alternatives above apply to most merge conflicts. In some unusual cases, you may be offered more specialized options.
Tip
To batch resolve conflicts, you can select them together in the File List,
right-click, and choose Resolve By Accepting Theirs
or Resolve By Keeping Ours in the context menu.
Merging a file with an external tool
Sometimes, accepting or rejecting the entire file is inadequate. There might be changes to combine in both “our” and “their” revision—this calls for more granular merging. GitFourchette doesn’t offer a line-by-line merge tool (yet?), but it can leverage an external merging program.
Note
GitFourchette supports standalone merge tools such as KDiff3, Meld, P4Merge, etc.; as well as the “merge” mode in several code editors, including JetBrains IDEs (PyCharm, IntelliJ), VS Code, GVim, etc.
To select a merge tool, go to
.
Chances are your favorite tool is available among the predefined commands.
Otherwise, you can enter your own command
(feel free to open an issue to suggest it).
Flatpak users: To use a Flatpak merge tool, be sure to
pick one of the flatpak run commands available at the bottom of the
presets in . In
addition, note that the Flatpak version of GitFourchette itself automatically wraps
all external commands in a
flatpak-spawn call.
In the Conflict View, the last option for fixing a conflict is a large Merge both versions in (External Tool) button. Click it, and GitFourchette will launch the merge program and wait for you to complete the merge in it.
When you’re done merging, save the file in your merge tool and return to GitFourchette (you may have to quit the tool). GitFourchette will pick up that the merge is complete and will prompt you to confirm or discard your merge.
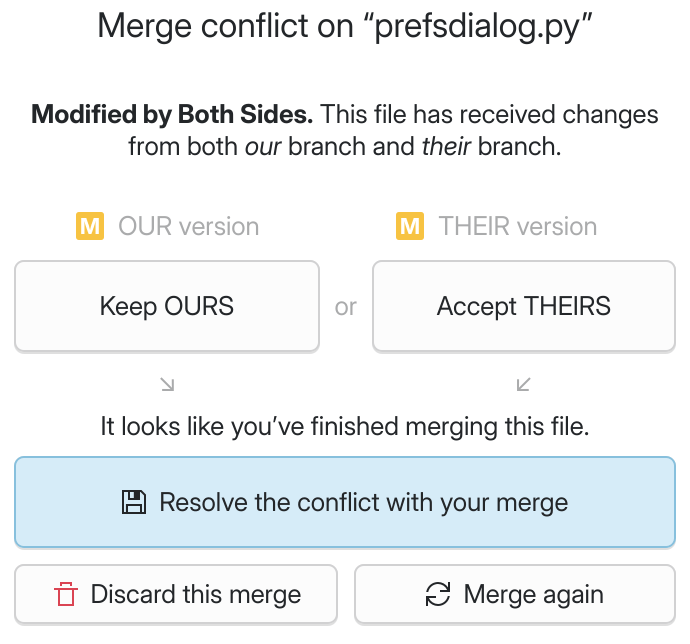
After finishing a merge in an external tool, return to the Conflict View to resolve the conflict with your merge.
If you discard the merge, the conflict will remain and you’ll have to
resolve it again. If you confirm, the conflict will vanish and, in most
cases, turn into a modification (), ready to stage and commit.
Concluding the merge
Once all conflicts are resolved in your working directory, the yellow Merging banner in the sidebar will turn green to inform you that no conflicts remain.
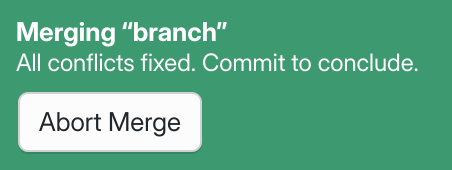
The Merging banner (below the Sidebar) turns green after resolving all merge conflicts.
When you see this, you should stage the conflict resolutions and commit your work to conclude the merge. Once you’ve made the merge commit, the banner will vanish and you can resume working in your repository as usual.
Note
A merge commit typically has two parent commits. As you prepare the merge, the graph displays the links to the parents that your future merge commit will have, once created.
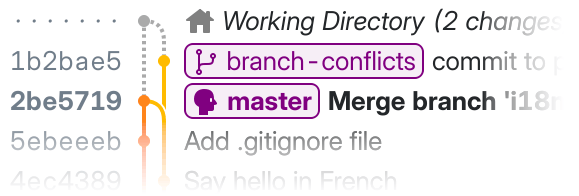
Preview of the future merge commit’s parents in the graph. Note the two dashed lines linking the Working Directory to the branches being merged.
Aborting a merge
If you change your mind about a merge, you can get your repository out of the “merging” state at any time.
To do so, click the Abort Merge button in the Merging banner below the sidebar. Aborting the merge will clear all unresolved conflicts, and all staged files will be reset.
Warning
Make sure there are no staged changes you want to keep before aborting a merge—all staged changes will be lost, even if they aren’t conflicting!
Blame & File History
New in v1.4.0.
The Blame Window lets you retrace the history of a specific file. It gives you access to:
A filtered commit history with only the relevant commits that made changes to this file;
A line-by-line breakdown of the last commit that is responsible for each part of the file.
To open the Blame Window, right-click on any file in the File List, then select Blame File. This is available both in the Working Directory and while exploring commits.
Tip
After selecting a file, you can press Ctrl L to open the Blame Window.
You can also drag a file from your system’s file manager and drop it on GitFourchette’s main window. If the file belongs to the current repository, GitFourchette will open a Blame Window for you.
Overview of Blame Window controls

File History Menu: Displays the relevant commits that contributed to this file. Pull down this menu to examine an older or newer revision of the file (more details below).
Back/Forward Buttons: Use these to return to a revision that you’ve looked at previously. You can also use your mouse’s back/forward buttons.
Newer/Older Buttons: Use these to navigate to a newer or older revision in the file’s history.
Reveal Full Commit: Click this to reveal the current commit in the main window.
Blame Gutter: Line-by-line revision history (more details below).
Commit Information Tooltip: Hover over the Gutter to bring up a tooltip with detailed information about a revision.
Tip
Hold Shift while clicking the newer/older buttons to jump to the top/bottom revisions in the history.
The blame gutter

The Blame Gutter.
Attached to the left side of the code, the Blame Gutter shows which commit is responsible for each line in the file. In other words, it tells you “who is to blame” for each piece of text in the file.
The background colors in the Blame Gutter give you an overview of the age of each line in the file. Think of these colors as a “heatmap” for recentness: the deeper the shade of orange, the more recent the line.
Any lines that were directly modified by the exact commit that you’ve selected in the File History menu are shown in bold in the gutter.
Note
In the gutter’s color scheme, the “age” of a line is relative to the revision you’re viewing. A deep orange means that the line is recent relative to the revision that is currently selected in the file history menu.
Hover over any part of the Blame Gutter to reveal a tooltip with more details about the commit that is to blame for the attached text.
Right-click on any section of the Blame Gutter for additional actions:
Blame File at Commit – Explore the contents of the file as of the given commit.
Show Commit in Repo – Select the given commit in the Main Window so you can explore this commit in the broader context of the repository.
Get Commit Info – Shows essentially the same information as the Blame Gutter tooltips, in copy/pastable form.
Mounting Commits As Folders
Note
This feature requires FUSE and the mfusepy package.
New in v1.6.0.
You can explore the contents of the entire repository at any point in time by “mounting” a commit as a folder that you can browse in your favorite file manager.
Right-click a commit in the Commit History and select Mount Commit As Folder in the context menu. GitFourchette will create a temporary mount point containing the commit’s file tree for you, and it’ll open your file manager to that location.
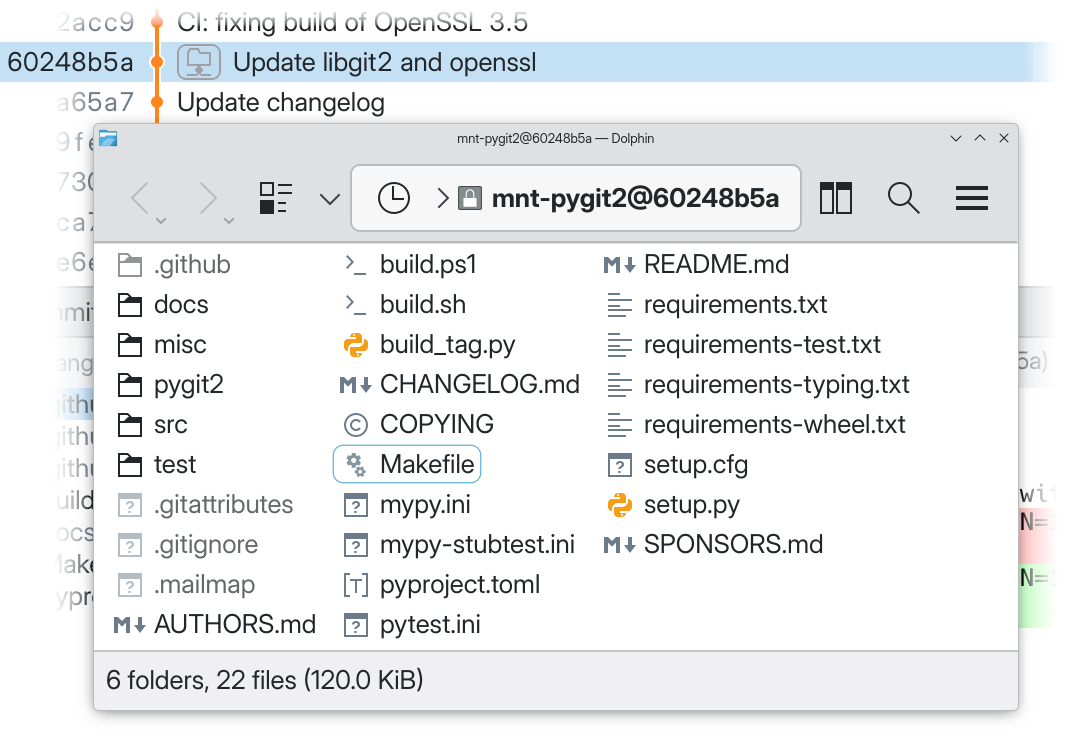
A “mounted commit” shown in the Dolphin file manager atop GitFourchette’s window.
You can mount several commits at a time. Commits that are currently mounted are adorned with a folder icon in the Graph View.
Once you’ve created a mount point, a Mount menu appears in the main menu bar. From there, you can reopen the folder, start a terminal in it, or unmount it.
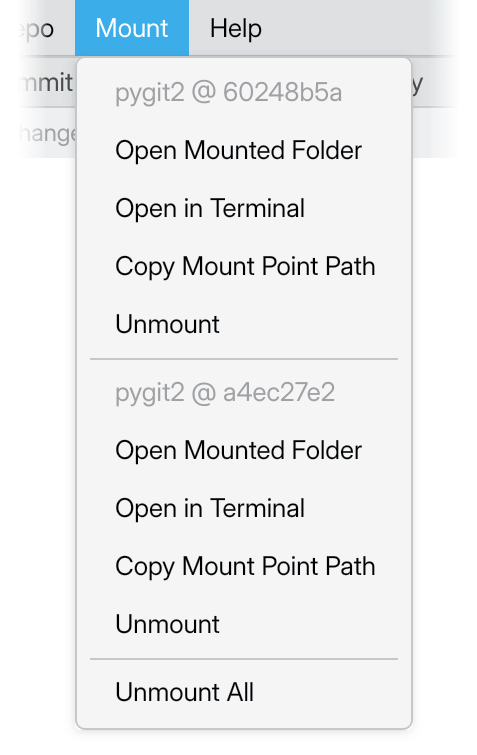
The “Mount” menu that appears once you’ve created a mount point.
Tip
The mount point is read-only and it only exists as long as GitFourchette remains open. It will be unmounted when you close GitFourchette. If you need write access to the files, consider checking out the commit in question instead.
Note
Mount points do not use extra disk space. GitFourchette installs a userspace filesystem (via FUSE) that serves the source tree using your repository’s Git object database.
Custom Commands
New in v1.3.0.
You can augment GitFourchette’s capabilities with custom commands tailored to your workflow. These let you launch commands in a terminal directly from GitFourchette.
You can even send items that you manipulate in the UI as arguments to the commands. These include the selected commit, file, branch, etc.
To define custom commands, go to and simply enter some commands (one per line). Here is a useful sample
to get you started:
# Feel free to copy/paste this sample into Custom Commands.
git rebase -i $COMMIT   # &Interactive Rebase
git rebase --continue   # &Continue Rebase
? git rebase --abort    # &Abort Rebase
git diff $COMMIT HEAD   # Diff Commit With &HEAD
After you click OK in the Settings, notice the Commands menu that appears in the main menu bar. You’re now ready to invoke your commands from this menu.
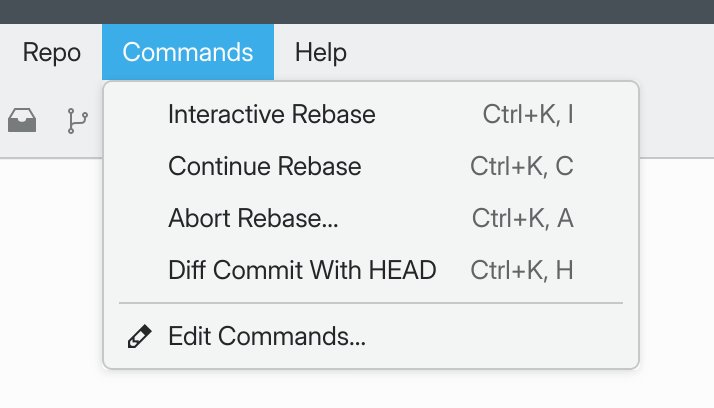
The Commands menu that appears once you’ve defined at least one Custom Command.
Tip
If you’ve chosen to hide the menu bar, you can also access your
commands via a pulldown menu attached to the Terminal
button in the toolbar.
Tip
To select which terminal program to use, go to .
Argument placeholders
You may use the following placeholders in your commands:
Token |
Description |
|---|---|
$COMMIT |
SHA-1 hash of the selected commit in the history |
$FILE |
Path to the selected file (relative) |
$FILEABS |
Path to the selected file (absolute) |
$FILEDIR |
Path to the selected file’s parent directory (relative) |
$FILEDIRABS |
Path to the selected file’s parent directory (absolute) |
$HEAD |
SHA-1 hash of the HEAD commit |
$HEADBRANCH |
Ref name of the HEAD branch |
$HEADUPSTREAM |
Ref name of the HEAD branch’s upstream |
$REF |
Name of the selected ref in the sidebar (local branches, remote branches, tags) |
$REMOTE |
Name of the selected remote in the sidebar |
$WORKDIR |
Path to the repository’s working directory (absolute) |
Titles and separators
The # character starts a comment until the end of the line.
If you add a comment after a command (on the same line), then the comment will serve as the title of the command in the menu.
To create a separator in the menu, insert a comment line of dashes
(#---) in between two commands.
echo 'hello world 1'

# The command above had no custom title.
# Let's define a custom title for the next one.

echo 'hello world 2'  # Say Hello (this is a custom title)

# Let's add a separator in the menu.
# -----------------

echo 'hello world 3'
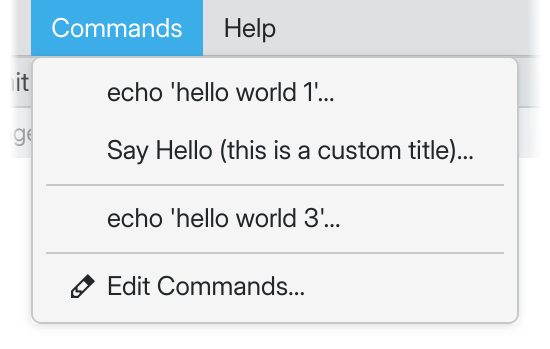
The example above rendered in the Commands menu (separator and custom title).
Keyboard shortcuts
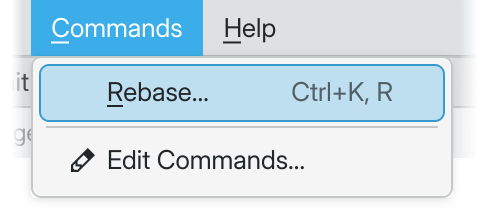
A command titled &Rebase.
When you set a custom title for a command, you can define an accelerator key
for this command by inserting & before some letter in the command title.
For example, titling a command &Rebase would assign accelerator key R to the command.
You can trigger accelerator keys in one of two ways:
Press Ctrl K, then your command’s accelerator key (e.g. Ctrl K then R).
Note
Let go of Ctrl K before pressing the accelerator key.
Or, pull down the menu with Alt C, then press your accelerator key (e.g. Alt C then R).
Confirmation prompt
By default, when you trigger any custom command, GitFourchette will give you a chance to review the prepared command before it’s sent to the terminal (with the proper substitutions).
You can turn off this behavior by unticking the checkbox at
.
If you’ve turned off the confirmation dialog for all commands, you can still
force it to appear before specific commands. To do so, prepend the commands of
your choice with the ? character. We strongly recommend doing this for
commands that may have destructive effects!
For example, ? git rebase --abort will always ask you to confirm,
even if you’ve unticked Ask for confirmation.
Limitations
Supported operating systems
GitFourchette is built primarily for Linux and it fits in great with KDE Plasma.
It can also run on other operating systems, but I don’t have the resources to support non-Linux platforms officially. You can download experimental, unsupported Mac and Windows builds from this CI job. You are welcome to report issues about non-Linux systems, but please keep in mind that these are not my priority.
Note
For now, experimental macOS builds from the CI job above are not signed/notarized. This may cause macOS to say the application is “damaged” until you remove the quarantine attribute.
Tentative feature roadmap
The features below are still missing, but I’d love for GitFourchette to have them. This will depend on demand, funding, and how much free time I can carve out for the project:
Rebase
First-class LFS support


